Head-Down 405 — Fly sequentials and hybrid formations
version 2026-09-27
Prerequisites
What you’re learning
You’ll learn to fly freefly sequentials and hybrid formations, which mix orientations in one formation. Head-Down 305 comes first, with the head-down group and big-way courses, because on these jumps you change orientation next to other people.
In Australia, head-down and mixed-orientation formation jumps of more than 3 people need a Freefly Crest (Head-Down), and more than 10 need a Star Crest.
Mixed orientations
Head-down, head-up, back and belly each have their own fall rate, so every transition can change your position and your fall rate at once. Match fall rate with your body position, and keep the grip light. Start with small groups.
Approach a head-down formation from the side, at hip level, outside the flyers’ shoulders. Directly above a head-down flyer is the burble off their feet, the no-fly zone, and flying into it can cork you down into the formation. On a head-up formation the burble trails upward, above the heads, so hip level works there too.
Stay out from under anyone who is inverting. A flyer going from head-up to head-down increases fall rate from about 200 to 240–260 km/h in a few seconds and closes fast on anyone below. Change orientation into clear air.
Breakoff:
- With others: track in your own orientation first, then flatten out. Going flat straight away from head-down is a cork under anyone still above you. After you deploy, fly the canopy separation plan you briefed.
Moving between points
Know whether you are base or mover for each transition. Hold your position, release, fly to the new slot, and dock at low relative speed. Tracking away to reset brings you back fast, into a hard dock.
The formations
Other jumps share these names, such as the Mixed Formation Skydiving (MFS) pancake, a gripped belly and back pair, so brief each one in full.
Rodeo. Build a round, head-up or head-down, and break it at one point, leaving two end flyers on a linked chain. One end flyer crosses over the other’s inside arm and travels over the linked arms down the chain, pulling it behind. The last person brings a hand around their head like cracking a whip, and the formation ties itself in a knot. Hold levels while the mover crosses each link.
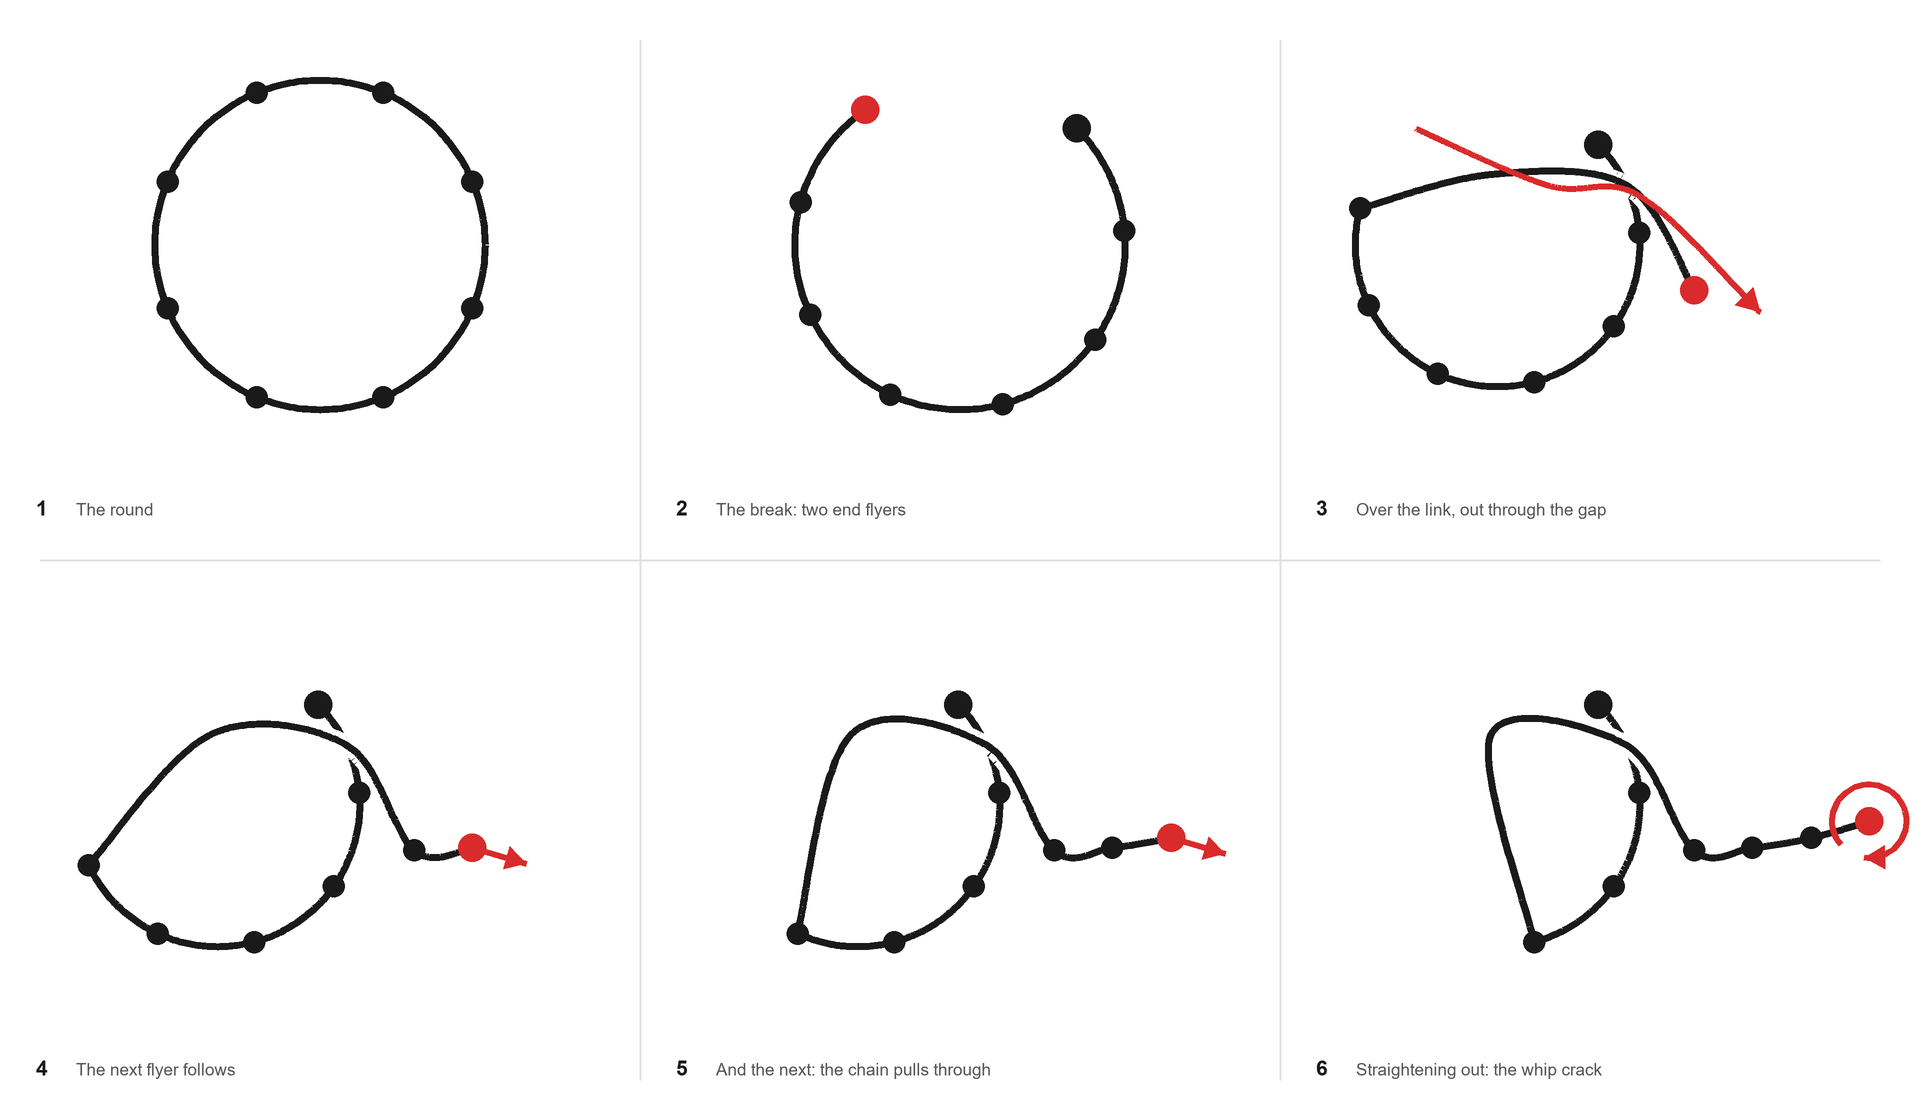
Black dots are the linked flyers and red is the mover.
Pancake. Flip a head-up or head-down round together to the other orientation, some flyers through back and some through belly. Key the flip so everyone goes at once, and keep grips soft, because fall rates split mid-flip.
Infinity. A round of six or more, crossed in the middle so the docks make a figure-8 from above. Half flips and the shape opens into a mixed round, then the other half flips and the figure-8 returns in the other orientation.
Alley-oop. Split a head-down round into two half-circles, one sliding anti-clockwise and the other clockwise. One piece starts on the inside and slides past on the outside, and the pieces rejoin into the round. Hold levels and the round’s diameter so the rejoin closes cleanly.
Totem, shorty, stair-step and compressed come from the VFS and MFS dive pools, so build them from those documents.
Common mistakes
| What happens | Usual causes | Check |
|---|---|---|
| Corked into the formation | Approaching a head-down formation from above | Come in from the side at hip level |
| A flyer inverts above someone | Orientation changed over the formation | Change orientation into clear air |
| The round goes unstable mid-flip | No single key, grips held hard | One key, soft grips |
If you cork, let go, because a grip held through a cork drags the other flyer with you. Recover to back-fly clear of the formation before you rebuild a point. More on corking.
Staying safe
Before the jump:
- Agree the formations, your role, the grips and the order of transitions, then dirt-dive every point, transition and release trigger. If a move was not agreed on the ground, leave it out.
- Exit linked when an unlinked approach would be unsafe.
- Brief breakoff, deployment and abort altitudes. Set your minimums higher than for a solo jump, because breaking off from a mixed-orientation formation is more complex.
- Gear check every flyer, belly slots included, for freefly-compatible rigs and handles clear of gripping hands. The rest is in Freefly 100. In Australia, every flyer on a hybrid, belly slots included, meets the freefly separation and equipment rules.
In the air:
- Check your altitude between points. At the abort altitude, stop building, wherever the sequence has got to.
When you’ve got it
Debrief the video for dropped points, timing and fall-rate mismatch, and log the formations and one thing to train next.
You’ve finished Head-Down 405 when you fly jumps in a row that go to plan, breakoff included, across a range of these formations, meeting everything on the coach’s checklist below.
Next
The competition route is Head-Down 404: Fly open vertical formation skydiving (VFS). For coaching, see Becoming a freefly coach.
For coaches: the checklist, assessment conditions and coaching priorities
The checklist
1. Plan the jump
- 1.1
- State the formation(s) or sequence, own role, the grips and the transition order; for an alley-oop, confirm which piece takes the inside lane first; for a pancake or infinity, confirm who keys each flip; for a rodeo, confirm which end flyer moves and which direction the chain pulls.
- 1.2
- Confirm the exit method (linked where an unlinked approach is unsafe) and each transition's base and mover.
- 1.3
- State breakoff and deployment altitudes and the abort-altitude commitment; sequential and hybrid personal minimums run higher than solo freefly because a formation breakup is more complex.
2. Prepare
- 2.1
- Complete a freefly-specific gear check for every flyer, with hybrid rigs confirmed freefly-compatible and handles clear of gripping hands.
- 2.2
- Dirt-dive each point, each transition and the release trigger, and agree the abort for each position.
- 2.3
- Confirm exit order and separation with the load.
3. Perform
- 3.1
- Build each formation from the safe approach angle, side and below for head-down, never into the feet-side burble.
- 3.2
- Transition between points by holding position, releasing, manoeuvring to the new slot and re-docking at low relative speed, not by tracking away and not by staging an orientation change over another flyer.
- 3.3
- Match fall rate across mixed orientations, bridging the gap with body position rather than forcing the grip.
- 3.4
- Ride out burble interaction with small inputs; on a cork, separate to a stable solo position rather than hold a failing grip.
- 3.5
- Release on the agreed trigger and fly to a stable solo position on any lost formation or spin.
4. Complete
- 4.1
- Initiate breakoff at the briefed altitude (within −0/+300 ft), with each flyer tracking in their own orientation before flattening.
- 4.2
- Check airspace and deploy at the planned altitude.
- 4.3
- Fly the briefed canopy separation plan.
5. Review
- 5.1
- Debrief the sequence against video, locating dropped points, timing errors and any burble or fall-rate mismatch.
- 5.2
- Identify one correction to train next.
- 5.3
- Log the jump naming the unit, the formations flown and the next focus.
Criteria in bold are safety-critical: they protect the flyer and everyone else on the load. A transition flown over another flyer, a missing release trigger or a low breakoff in a mixed-orientation stack puts more than the flyer at risk.
A coach should not sign off the course while a bold criterion is Not Yet Satisfactory, however good the rest of the flying. Outside a course they are strongly recommended practice. Regulation stays with your federation and your drop zone.
Assessment conditions
- Sky and tunnel. The Perform criteria that build points with others are assessed on sky jumps with real formations. Tunnel work is preparation.
- Sky jumps from 12,000 ft or higher (recommended), and higher for larger or mixed-orientation builds.
- Video is the main debrief and assessment tool.
- Equipment: a visual altimeter, a working audible, an AAD (recommended), and freefly-compatible gear for every flyer, belly slots included.
- The assessor is a freefly coach current in sequential and hybrid flying, using this checklist.
- Ask the flyer to talk through: why a freefly sequential is harder than a belly one; the approach angle for head-down and head-up formations; why nobody flies below an inverting flyer, and how to stage orientation changes into clear air.
- Also ask for: the full sequence of at least two of the rodeo, pancake, infinity and alley-oop, including the alley-oop from a piece leader’s view; the burble and cork response for the randoms flown; and why minimums and the release trigger matter more on these jumps.
- Each criterion is marked Satisfactory or Not Yet Satisfactory. The course is recorded as a milestone.
- There is no set jump count.
- The tunnel suits drilling the formations, and exits, breakoff and building points with other people need the sky.
- If you already fly sequentials and hybrids, your coach can assess you on one jump plus your logbook and video.
Coaching priorities
Safety first, then fun, then learning. These are fun jumps and the hazards are serious: hold the approach angle, the release trigger and the higher breakoff to the bold standard, however well the rest goes. Calling a move off because its mechanics were not agreed is the right call. Debrief without blame, and end each debrief on something that went well, with one focus for the next jump.
Where this comes from
- The Freefly Project’s own descriptions of the rodeo, pancake, infinity and alley-oop. A search of magazines, event reports, glossaries, competition rules and video in July 2026 found no published account of these mechanics.
- APF VFS dive pools (2-way Open, 2019; 4-way Open, 2023): the totem, shorty, stair-step and compressed randoms.
- USPA and AXIS Flight School Foundations of Flight material on docking on a head-down formation and on the MFS randoms: approach angles and the no-fly zone.
- Skydive Mag on 2-way mixed freefly competition and on freefly breakoff, and Skydive Arizona on MFS and learning to freefly: mixed orientations, hybrids and breaking off in your own orientation.
- APF Freefly and Angles Guide (APF006, August 2023): planning and breakoff guides.
- APF Operational Regulations (V01-2026), as jurisdictional context.
Regulations where you jump
Regulations change, so each rule is given with its document reference, as context for where you jump.
- Australia (APF). Head-down and mixed-orientation formation jumps of more than 3 parachutists need an FFC-HD (OR 9.2.2). More than 10 need a Star Crest (OR 9.1.3).
- A functioning audible altimeter is mandatory on every freefly descent (OR 9.2.3).
- A hybrid that includes belly slots still meets the freefly separation and equipment rules for every flyer.
- The assessor in Australia is an APF Freefly Coach. Elsewhere, use the national or drop zone equivalent.
Acronym key. APF, Australian Parachute Federation. OR, the APF Operational Regulations. FFC-HD, Freefly Crest (Head-Down). VFS, vertical formation skydiving. MFS, mixed formation skydiving.
Suggest a change to this page open
Spotted an error, or know something this page should cover? Tell us. We read every suggestion and add the ones we accept to the site.
The coaching priority order
Safety → Fun → Learning
Every course, briefing card and debrief on this site is built in this order. When two of them pull against each other on the day, keep safety ahead of fun, and fun ahead of getting through the course.
- 01 Safety
Safety comes first on every jump. Nothing further down this list is worth a safety risk.
- 02 Fun
Skydiving costs a lot. A jump you enjoy brings you back for the next coached one, and coached jumps are where the safety habits are practised.
- 03 Learning
The skills each course teaches. They stick best after a jump that was safe and fun, because you keep practising what you enjoy.